This recipe is: Gluten-free (GF), Wheat-free (WF), Dairy-free (DF), refined Sugar-free (SF), Plant-based/Vegan (PB), Vegetarian (V)
| Prep Time | 15 minutes |
| Cook Time | 0 |
| Passive Time | 0 |
| Servings |
servings
|
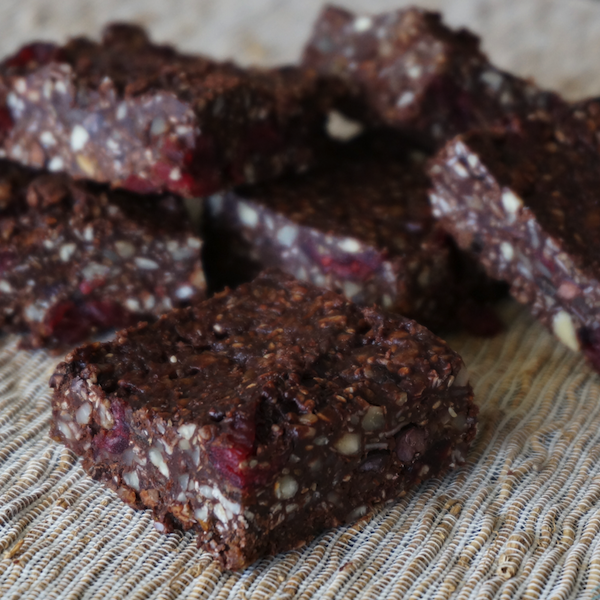
- 1½ cup Chocolate Chips (550g/20oz) (choose dairy-free & gluten-free - *see recipe notes below)
- ½ cup Almonds
- cup Pecan Nuts
- 1 cup Coconut Flakes
- 1 cup Dates (pitted Dates)
- 2½ tbsp Raw Cacao Powder
- 1 pinch Sea Salt
- ½ cup Cranberries (or any other dried fruit of choice)
Ingredients
|
|
- Gently *warm the Chocolate Chips until melted (see recipe notes below for instructions on how to warm Chocolate Chips).
- Pulse together the Almonds, Pecan Nuts, Coconut Flakes, Dates, Cacao Powder, Salt.
- Combine the mixture with the melted Chocolate Chips and the Cranberries and mix well using a wooden spoon or silicon spatula.
- Line a baking tray with non-toxic baking paper/parchment paper and spread the mixture even over the surface. Use a knife to cut the tray into squares. Place in freezer for 5 minutes to allow to set.
*Chocolate Chips I buy are simply made from raw organic Cane Sugar, Cacao Butter and Cacao Powder.
*Can make and use 3x portions of our Chocolate Sundae Sauce as a replacement if you can’t find clean Chocolate Chips.
*To melt Chocolate Chips - I heat some water in a pot, then place a stainless steel bowl in the pot, add a little heated water to the bowl, and then add a glass bowl in which the Chocolate Chips can melt without it getting too hot/burning. We want the Cacao Butter to remain healthy for us, so avoid heating it more than 40 °C / 104 °F.
*Enjoy straight away or allow to set in fridge for 15+ minutes. Store in a sealed container in the fridge or freezer.
*Choose the cleanest ingredients possible:
-Choose spray-free/organic fresh produce for fresh ingredients where possible, and if buying conventional, rinse in diluted white vinegar water to remove
-Choose dry ingredients (i.e. nuts, seeds, dried fruits ) that are spray-fee/organic where possible, and which don’t have preservatives such as sulphur dioxide
- Choose virgin, cold-pressed Coconut Oil in glass where possible. It should be pure white in colour. Do not choose cheaper, deodorised/neutral flavoured coconut oils that are off-white.
-Choose Coconut Cream and Coconut Milk that is clean/free from additives, preservatives and E numbers. Plain Coconut Cream/Milk is better than the ones with added guar gum as this changes the consistency of recipes. You can use Nut Milk as an alternative.
-Choose to homemade Nut Milk instead of buying. Most store bought ones have additives and stabilisers. Quick Tip: It’s easy to make your own: just grind ¼ cup nuts, then blend with 1 cup water.
-Choose whole fruits over optional sweeteners if you need to add more sweetness. My preferred choice is Date Paste (pre-soaked Dates). Quick Tip: Keep a jar filled with Dates covered with water, in the fridge ready to go and use as is (instead of actually blending to make Date Paste).
Quick Link to FLIMJ Program resources for Fresh Life Healthy Sweet Quick Fixes:
Module 2 - refresh on information about The Toxic Fat Effect and how bioaccumulation of toxins in our bodies can lead to weight gain (that’s hard to lose), brain fog, low energy and many more poor health symptoms.
Module 3 - To get you into the swing of things, redo our 7 Day Healthy Sweet Quick Fixes Challenge - you’re always supported in our Fresh Life Tribe (Private Facebook Group), no matter when you decide to do any of the 7 Day Challenges.
You’ll find your Recipe Book: 7 Days of Healthy Sweet Quick Fixes and Shopping List print offs to guide you through the challenge.


 Wheat-free; Gluten-free; Dairy-free; refined Sugar-free; Vegetarian; Vegan; Paleo/Banting