| Prep Time | 15 minutes |
| Cook Time | 30 - 40 minutes |
| Passive Time | 30 - 40 minutes (while baking) |
| Servings |
servings
|
- 2 tbsp Coconut Oil
- 2 large Yellow / Brown Onion
- 2 nobs Ginger (1 inch / 2 cm)
- 2 cloves Garlic
- 2 large Red / Green Chillies (with seeds = spicy, without seeds = less spicy)
- ½ bunch Coriander (fresh)
- 3 tbsp Yellow India Curry Paste [Make your own - see recipe notes]
- ½ large Sweet Potato
- 3 large Potatoes
- 1½ cup Chickpeas (1 tin pre-cooked Chickpeas - choose BPA-free tins if possible)
- 1½ cup Tomatoes
- 1 cup Nut Milk (Cashews/Almonds)[Make your own - see recipe notes]
- 1 cup Coconut Milk
- 1 cup Veggie Stock
- 1 tbsp Ghee (optional)(or Organic/clean, Free-range Butter or Coconut Oil)
- 1 tbsp Coconut Aminos / Tamari (or 2 tsp Sea Salt)
- 1 tbsp Apple Cider Vinegar
- 1 tbsp Rice Malt Syrup (or Coconut Blossom/Maple Syrup)
- 2 tsp Potato Flour (optional - for thickening the sauce)
- 1 large Zucchini
- 1 cup Quinoa
- 2 cups Spring Water
- ¼ cup Simple Raita (chopped Cucumber mixed with Coconut Yogurt)
- ¼ cup Coriander leaves (fresh, chopped)
- ¼ cup Chopped Sambal Salad (chopped Red Onion, Cucumber, Tomatoes & Coriander)
- ¼ cup Banana (fresh, sliced)
- ¼ cup Broccoli Flowers (raw Broccoli flowers shaved from Broccoli head)
- ¼ cup Mango Salsa (see recipe notes)
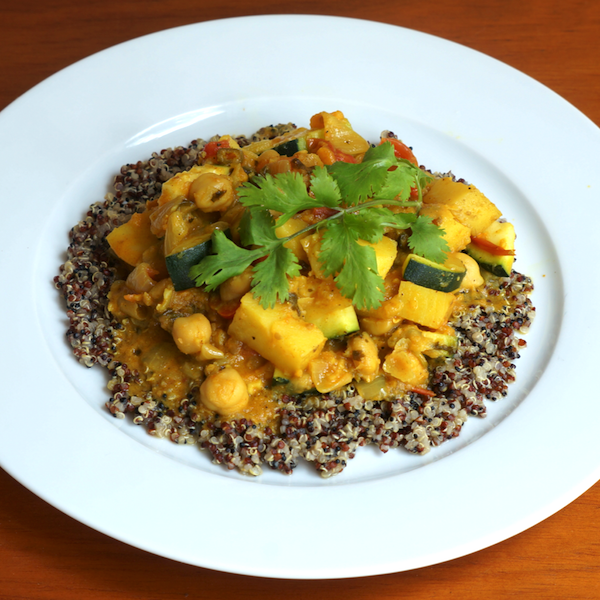
Ingredients
Yellow Indian Curry Dish
Quinoa
Toppings
|
|
- Roughly chop Onions, add to a large pot with 2 tbsp Coconut Oil and cook until soft.
- Finely grate/chop the Ginger, Garlic, Chillies and Coriander. Add all this, plus the Curry Paste to the pot and cook for 2-3 minutes.
- Wash and cut the Sweet Potato and Potatoes into 1 inch cubes (approx.), rinse and drain the Chickpeas and blend/puree the Tomatoes. Add to the pot.
- Add the rest of the ingredients except the Zucchini. Top up with Spring Water if there is not enough liquid to cover the veg. Bring to a boil and then turn down to mid-low heat and allow to simmer for 30-40 min until water evaporates and potatoes are cooked through.
- While Curry is cooking, in a separate pot, bring the Quinoa and Spring Water to the boil. Strain the Quinoa - keep the water. Put the Quinoa in a stainless steel strainer on top of a pot, with the left over water in the bottom of the same pot and simmer the water to steam the Quinoa for 10 - 15 minutes (cover with a lid to keep moisture in).
- 5 min before serving, slice the Zucchini and stir in to allow it to cook for a few minutes before serving (adding in last prevents Zucchini from being overcooked).
- Serve the Curry on cooked Quinoa with a selection of Toppings.
*You can basically use any veggies you have in your pantry or fridge, and cook with the Yellow Indian Curry Paste to cook up a hearty Curry Dish.
*I make bulk batches of this Curry Dish and portion and freeze for future quick and easy meals.
*Make your own Nut Milk: Grind ¼ cup nuts, then blend with 1 cup Water.
*You can make your own homemade Yellow Indian Curry Paste - I also make this curry paste in bulk batches and portion and freeze for future use.
*Check out this Yellow Indian Curry Dip made with the same Yellow Indian Curry Paste.
*Choose BPA-free tins when buying pre-cooked Chickpeas if possible or even better, see below recipe for cooking your own Chickpeas from scratch (it’s not as difficult as it seems, just allow a couple days before to prepare and cook them).
Serving Suggestions:
* Serve with cooked Rice or Quinoa
* Make a Fresh Mango Salsa for a topping - 10 minutes to make
If no Mango, still delicious without.
1/2 Mango (large)
1/2 Red Onion
1/2 cup Tomatoes
1/2 cup Cucumber
1/2 bunch Coriander (fresh)
Chop into small pieces and mix together and serve fresh as a topping with any Curry Dish.
Clean Eating Tips to remember:
*Stainless Steel and Ceramic or Glass Cookware are the safest materials to cook in with the least amount of leaching into food when heat is applied. A high quality set of cookware is essential and will last a lifetime - and a longer lifetime at that because of it.
*Stainless Steel, Food-grade Silicon or Wooden Cooking Utensils are the safest materials to cook with with the least amount of leaching into food when heat is applied.
*Olive Oil - it’s best not to cook with Olive Oil, always consume raw. Best to drizzle Olive Oil over food just before serving. It’s better to avoid cooking with Olive Oil as it is a delicate oil and is damaged and becomes harmful to ingest when heated.
*Better oils for cooking with have a higher smoke point/less free radical forming when heated— Coconut Oil, Macadamia Oil and Grapeseed Oil
How to cook your own Chickpeas from scratch:
NOTE: Start this 2 days before you want to use Chickpeas in a recipe.
1 cup dry chickpeas = approx. 2 - 2 1/2 cups cooked chickpeas
Day 1 - evening
1 cup dry Chickpeas
3-4 cups Spring Water (water should be double higher than chickpeas in dish)
1 tsp Salt
1. Put ingredients in a large ceramic or glass bowl - the Chickpeas will swell to 2-3x their dry size.
Day 2 - morning
Drain Chickpeas and change the salted water.
Day 2 - evening
Put Chickpeas in large pot of Spring Water
Cook for approximately 1 hour+ until chickpeas are soft.
Drain, let cool and refrigerate in sealed glass container.
Day 3 - Recipe day
Chickpeas are ready and waiting to made into your recipe of choice!