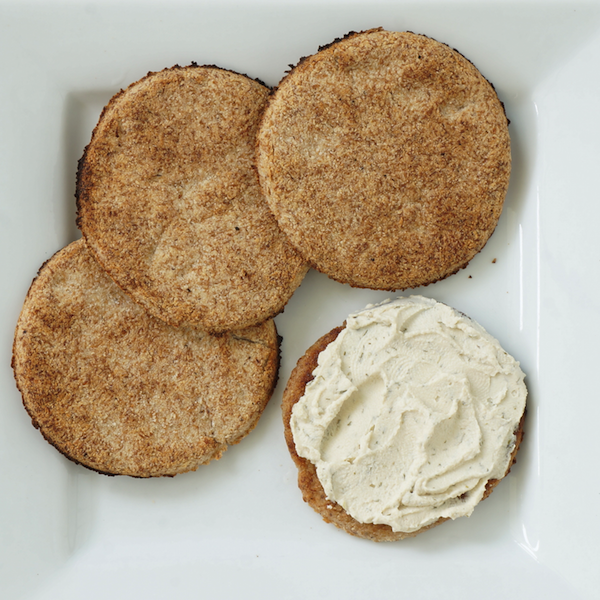
These quick and easy to make flatbreads are great for a quick snack. You can toast them up, add some coconut oil, and serve them up with some nut butter or cashew nut cream cheese. They have a slightly sweet taste and get a little crunch when they are toasted, which makes them yummy replacements for burger buns. You can make a whole batch and keep them in the fridge or freezer, and use when needed.
This recipe is: Gluten-free (GF), Wheat-free (WF), Dairy-free (DF), refined Sugar-free (SF), Plant-based/Vegan (PB), Vegetarian (V)
Print Recipe
Coconut Buckwheat Flatbreads
You will need: 1 large mixing bowl; wooden spoon/silicon spatula; measuring cups & spoons; food-grade silicon baking sheet or non-toxic parchment/ baking paper lined baking tray (please avoid flatbreads coming into contact with toxic non-stick coatings); small bowl for 'cutting out' flatbread shapes; bleach-free paper towel and air-tight container or large ziplock bag to store in fridge/freezer.
Mix all dry ingredients together in large mixing bowl.
Add Coconut Oil and Water and mix well.
Spread dough (1cm / ½ inch thick), use a small bowl to ‘cut’ out round flatbread shapes.
Place on baking tray lined with non-toxic/unbleached parchment/baking paper.
Bake for approx. 10-15 min each side or until golden.
Recipe Notes
If you can't find Buckwheat Flour, as with most nut and seed flours and meals, you can easily make your own - which I often do myself - by purchasing the whole food ingredient i.e. Buckwheat seeds, and using a blender with grinder blades (at least 2 blades lie flat), or use a coffee grinder to grind the nuts/seeds into a flour/meal.
You can also substitute Almond Meal (ground Almonds) in place of Buckwheat.
Wait until cool, and then wrap in bleach-free/non-toxic paper towel in an airtight container or large ziplock bag.
It is best to store your bread in the fridge or freezer - it will also last longer.
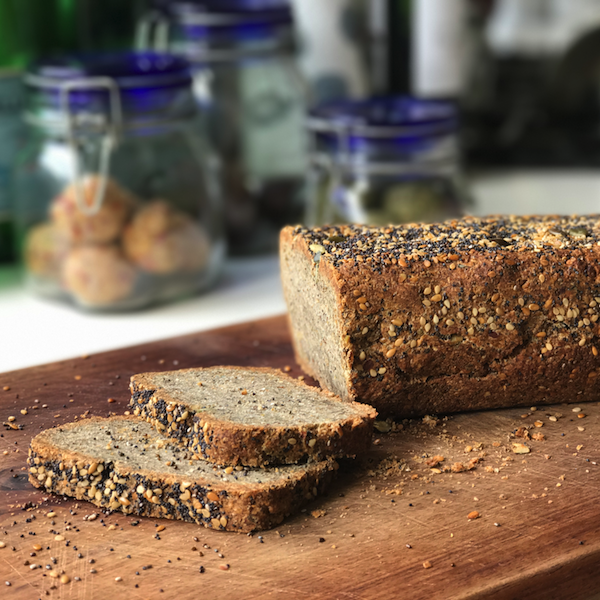
This bread is amazing. I actually prefer it to any of the gluten-free breads I have bought and tried over the years. Probably a year’s worth of recipe developing to get this gem just right, and I couldn’t be happier with the result. It’s delicious straight out of the oven, and even better sliced and toasted before adding toppings. We eat this for breakfast, lunches and sometimes dinners. I travel with my food-grade, non-toxic silicon bread pan so I can make this bread for us no matter where we are in the world!
This recipe is: Gluten-free (GF), Wheat-free (WF), Dairy-free (DF), refined Sugar-free (SF), Plant-based/Vegan (PB), Vegetarian (V)
Print Recipe
'Clean' Multiseed Bread (Gluten-free/Wheat-free)
You will need: blender with grinder blades (at least 2 blades lie flat), or use a coffee grinder - to grind nuts & seeds; 2 mixing bowls (1 large); whisk; wooden spoon/silicon spatula; measuring cups & spoons; food-grade silicon bread pan or non-toxic parchment/ baking paper lined bread tin (please avoid bread coming into contact with toxic non-stick coatings); drying/wire rack for baked bread to cool off on before cutting; bleach-free paper towel and air-tight container or large ziplock bag to store in fridge/freezer.
Dry Ingredients: Grind Almonds & Flaxseeds down to a flour-like consistency, using a blender (with grinder attachment - see description above).
Dry Ingredients: Combine all dry ingredients in a large mixing bowl and set aside.
Dry Ingredients - Seed Mix: Combine all Seed Mix ingredients together. Pulse into a course consistency and add to the rest of the dry ingredients.
'Egg replacer': Separately, combine Spring Water and ground Chia Seeds well using a fork and allow to stand for a few minutes before using.
Wet Ingredients: Add the rest of the wet ingredients to the ‘Egg replacer’, and mix well using a fork.
Add the wet ingredients mixture to the dry ingredients and mix well using a spatula or wooden spoon - I prefer a silicon spatula.
Line an 8” x 4” bread pan with non-toxic parchment/ baking paper or use a food-grade, silicon bread pan instead - best to avoid bread pans with toxic non-stick coatings.
Spread the mixture into the bread pan. Add the bread topping and spread and press the seeds into the surface of the bread.
Bake for 60 min or until golden - use a knife to check middle of bread, if comes out clean/dry, bread is done.
Remove and let sit for 2 minutes in the bread pan before removing. Then remove and let cool on a drying/wire rack - this will allow the base of the bread to breathe/stay dry, and not ‘sweat’.
Recipe Notes
Be sure to let your bread cool down completely, then cut into thin slices. Admittedly, this bread's crust can be a little crunchy so it might take a little effort to cut the whole thing into slices. Slicing the whole bread and storing this way makes it easier to use/consume.
Wait until cool, and then wrap in bleach-free/non-toxic paper towel in an airtight container or large ziplock bag.
It is best to store your bread in the fridge or freezer - it will also last longer.